4Industry information
Toilet partition material selection
What materials should be used for bathroom partition decoration? The design of the bathroom is basically convenient, safe, easy to clean and beautiful. Because there is often water vapor in the room, the interior decoration materials must be mainly waterproof and moisture-proof materials.
1, bathroom partition ground material: the ground should be waterproof, dirty, non-slip granite, etc., the height should be lower than the other ground 10-20mm, the floor drain should be lower than 10mm left glaze winter to facilitate drainage.
2, bathroom partition wall material: the bathroom wall area is the largest, must choose strong water resistance, but also with corrosion resistance and anti-mildew materials. Easily cleaned tiles, marbles, mosaics and other colors, can collage rich patterns, and smooth smooth and easy to dry, is a very practical wall material, but pay attention to the color of the ground material.
3, the top surface of the bathroom partition material: the top surface is affected by water vapor, the most easily moldy, waterproof and heat-resistant material is better. Generally use colorful molding aluminum buckle plate and acrylic molding ceiling, these materials are strong water resistance, the surface is covered with heat insulation material, is the ideal material for bathroom ceiling, the specifications are 120mm wide strip and 300mm*300mm square, the surface structure has two kinds of flat plate and micro void. Acrylic molding ceiling price is low, but easily aging; The price of colorful molding aluminum pinch plate is higher, but the color is diverse, durable, and it is the main material used in the modern bathroom ceiling. In addition, there is the use of aluminum-plastic board or calcium silicate board, the latter surface coated with cement paint, low price, strong waterproof.
Bathroom partition installation steps
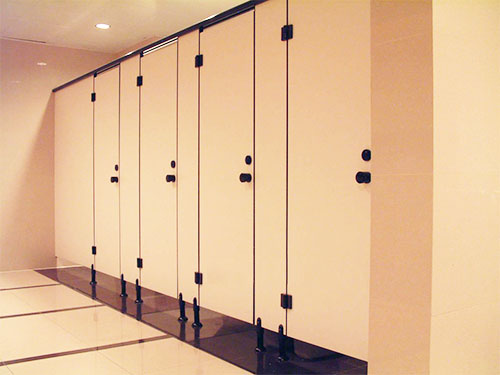
Step 1: Install the fixing plate
Find the right position on the wall to draw the center line of the fixed piece, see that there are several fixed screw holes on the fixed plate, and then punch several holes on the corresponding center line of the wall, put the plastic sleeve into the hole, and then fix the fixed plate on the wall with expansion wire.
Step 2: Install the adjusting base
According to the pre-designed construction drawing, find the base position on the bathroom floor and draw the center line, and then fix the base (the base position is about 20 cm away from the edge of the partition board).
Step 3: Install the compartment board
The first two steps are to lay the foundation for the installation of the compartment board, the role of the fixed board and the base is to fix the compartment board, put the compartment board on the adjusting base, and then adjust the height of the base so that the compartment board is close to the fixed board on the wall, and then fine-tune the height of the base so that the compartment board is a certain distance from the ground, about 15 cm, and then use a level to determine the level. After everything is adjusted, screw the compartment board to the fixing plate and adjustment base.
Step 4: Install the pull rod
Cut and fix according to the actual length of the compartment. When the straight tie rod is connected flat, the circular connecting sleeve and the urgent connecting spring plate must be installed in the tube to ensure the joint is smooth and strong, and the connecting place should be stretched in the fixing plate to increase the appearance. For the 90-degree Angle tie rod of the compartment, the 90-degree Angle joint formed by aluminum alloy injection molding is used to connect the tie rod at both ends of the Angle. A convex circular wall fixing sleeve is used to fix the terminal pull rod on the wall with screws. Use screws to connect the pull rod to the fixing plate on the upper edge of the column.
Step 5: Install the column
Use screws to fix the tie rod fixing piece, fixed in the middle top of the column, with L-shaped fixed pieces, the column and the compartment plate fixed combined with one wall side column - draw a straight line with the ground on the wall, drill the 3 outer holes with an electric drill, embedded plastic plugs in the hole, after determining the vertical and the ground, use screws to fix the L-shaped fixed piece, the wall side column is fixed on the wall 145 high. Terminal column - Fix the upper edge tie rod fixing plate and L-shaped side joint plate to the terminal column, and then fix the plate to the compartment plate with screws
Step 6: Install door panels
Fix the hinge seat or nose on the column, measure two or three on the line, and then install the corresponding number of hinge pieces at the corresponding position on the door, gently lift the door, place the automatic homing nylon seat in the hinge seat, adjust the position, and open and close the door to check when the door can be switched freely, check and adjust until satisfied.

